Tube Fitting Reassembly
NOTE: Before disassembling a Swagelok tube fitting, always depressurize the system.
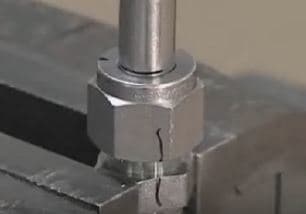
The first step in disassembly is to mark the tube along the line of the nut, then run a line all the way along the body flats of the nut and fitting as shown.

These marks help to ensure that the nut is returned to the previously pulled up position. Now unscrew the nut to release the tube.
When ready to reassemble the fitting, insert the tube with pre-swaged ferrules into the fitting until the front ferrule is sitting flush against the fitting body. If the fitting is over one inch (25 mm), it might be needed to lightly lubricate the threads and rear surface of the back ferrule.
Next, hold the fitting body steady and turn the nut to the previously pulled-up position using a wrench. This position is indicated by the marks on the tube and flats. The nut and fitting lines should be in-line and the nut should be butting up against the horizontal line on the tube. A significant increase in resistance will be felt at this point. Tighten the nut slightly to complete the reassembly. A video of this process is available.
NOTE: Do not use the Swagelok gap inspection gauge with reassembled fittings.
Alternatively, the instructions can also be found on page 12 of our Installer's Pocket Guide for Swagelok Tube Fittings.
Safe Product Selection
The complete catalog contents must be reviewed to ensure that the system designer and user make a safe product selection. When selecting products, the total system design must be considered to ensure safe, trouble-free performance. Function, material compatibility, adequate ratings, proper installation, operation, and maintenance are the responsibilities of the system designer and user.
